The post Insert Metals Into Your 3D Prints appeared first on Best Cheap 3D Printers.
]]>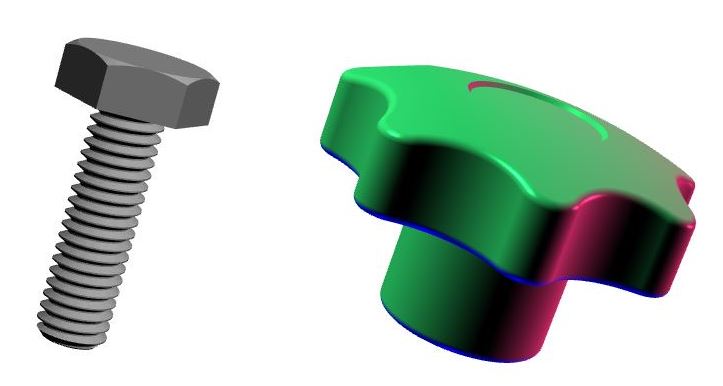
Do you want to add more variety and functionality to your 3D printed parts? In this post we learn how to produce Metal-Plastic combinations. The metal parts can play the role of a connecting element for example a bolt or a nut in a knob.
Or they can add strength to the functional surfaces of our plastic parts for example brass bushes inside the holes. We can insert magnetic elements to our plastic parts and use them for example to stick to some surfaces or for sorting them.
Methods of Metal-Plastic 3D Printing
We focus on two different methods and watch a number of examples that are presented in the following youtube videos.
These methods are :
- Design Method: Design your model with appropriate geometry for metal ( or non-metal ) insert and consider a pause in its 3D printing process for adding the insert to the part.
- Thermal Element Method : Using heat to enter metal inside the holes of the plastic part.
Each one of the selected videos includes a number of very helpful and important points and resources. By watching all of them we can gain a very good view of how to perform this task completely and without problem.
We try to mention the important parts before each video.
Now Relax and enjoy watching them…
1: Design Method
1-1: Inserting A Nut In A Knob
In this video Chuck from CHEP 3D Printing & Electronics Youtube channel beautifully shows how we can create a spare, out of a sample part and guides us through all the following steps to :
-
Scan the part with a 2D simple scanner and produce a 2D image from the main side of the part in .jpg or .PNG formats.
-
Use an image editing software ( like Instant Alpha in Macs or GIMP for windows ) to remove the background from the image and trim the excess details , and eventually change it to a format which is usable by 3D modelling software. ( SketchUp)
-
Use an online free .PNG to SVG converter.
-
Complete the model with 3D modelling software and add the appropriate interior hole for inserting the nut. Save the model to .STL format which is usable by 3D printer.
-
Use the Slicer software to Slice the model
-
Print up to a height to stop the printing process and placing the nut in the plastic and then resume the print to complete the part.
Note: Chuck is using a feature in a da’Vinci software to pause the print and resume from the last point of pause after putting the nut in. This pause could be easily programmed using a plugin in CURA free software. ( Click Here to see how!)
Chuck is a great teacher. Now watch this interesting video and enjoy it….
There are still more helpful and important points to learn so continue watching the rest of videos below.
1-2: Insert A Nut In Your 3D Print Using CURA
In this interesting video DIY3DTECH.com youtube channel is using Tweak at Z 4.2.0 plugin (Pause at height ) in CURA to set the appropriate pausing height for inserting the nut.
If you want to know more about this useful plugin in CURA, please click here.
1-3: Insert A Hex Bolt Into A 3D Printed Part
This interesting video has been prepared by CAPINC you tube channel.
He introduces McMaster-Carr website that has a big library of mechanical parts and allows you to download the solidworks model of most of the parts. So if you are using solid works, now you have access to a big and invaluable source of the parts and drawings. Actually you can find a wide range of file formats including DXF and DWG.
He finds the file for a bolt that he wants to insert into a 3D printed knob.
Like the previous videos he makes some slight changes in the knob model and locates the pause height.
There are two important points here:
- Spray a layer of an anti rust material on the outer surface of the bolt. That helps the molten plastic to adhere well to the bolt.
- Make sure that the top of the hex head of the bolt sits below the horizontal line of the last layer before pausing. Why? To prevent the extruder head to hit the top of the bolt after resuming the printing process.
2: Thermal Method / Put Threaded Metal Inserts In Your 3D Prints
2: Thermal Method / Put Threaded Metal Inserts In Your 3D Prints
2-1: Using Heat or Press Fit Elements
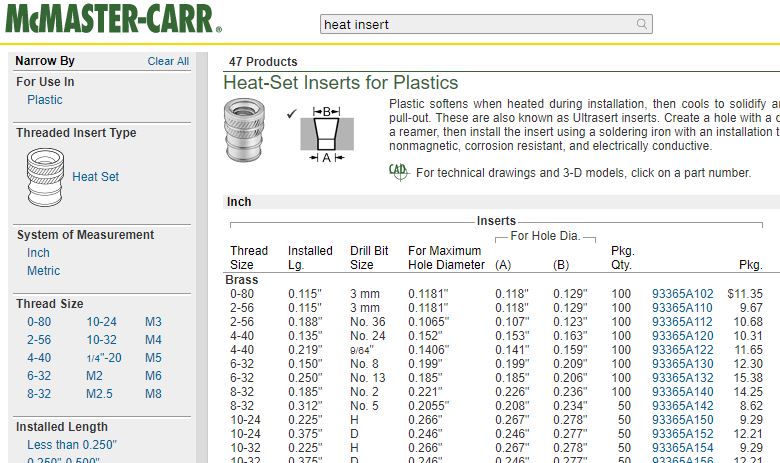
Heat insert
In this interesting video David from CAPINC youtube channel is showing how to insert metal parts in a 3D printed part using heat . It’s easy and useful.
He uses Metal Heat Inserts for the plastics from McMaster-Karr website.
Point 1: In each McMaster-Karr product page you can find the maximum hole diameter that is appropriate for each insert. You can use this diameter when designing your part with 3D modeling software. Generally before you buy the brass inserts make sure that their outside diameter is slightly bigger than the inside diameter on your 3D printed plastic parts.
Point 2: He introduces press fit expansion inserts in McMaster-Karr website. With special shape that these parts have they don’t need heat to go inside a whole and then after you fasten a bolt in them their outside diameter will expand and create a good press fit with the plastic part.
Now relax and enjoy this video….
2-2: Some More Points on Thermal Inserts
Now we pay attention to some more points from the following video from MakerBot youtube channel.
Point 3: To prevent overheating, make sure not to complete inserting the parts all through their lengths in just one run. Do for example around 80 percent in the first run and then complete the rest of it in the second run.
Point 4: When fastening the bolts inside the inserts be careful and do not over tighten the bolt. This can break the plastic surrounding the insert and ruin your 3D printed part.
2-3: Levelling the Inserts inside plastic 3D Print
You may ask yourself,”How can we make sure the top of the insert is at the same level as the top of the plastic?”
Point 5:The following video from tgammoncad youtube channel is showing a very interesting and easy way to do it. He inserts the metal up to 80 percent of the length inside the plastic and then while the metal insert is still warm presses it to the flat surface of his desk until the inserting is complete. You can also do this by having a (metallic or wooden) flat surface available and just press it with your hand on the insert until it goes completely insider the plastic.
Now enjoy watching the video….
Useful Links
Press-Fit Inserts for Plastics
Bottom Line
Now we have found more opportunities to build parts with more and better functionalities. With inserting metals in your plastics you can create mechanically stronger parts.You may need wear resistance in your plastic parts and adding an appropriate metal part can provide it for you. You may need some magnetic properties in your 3D printed parts.
Use your creativity to find more and more opportunities. Isn’t it exciting?
See you soon in the future posts.