The post 3D Printing Electro-Mechanical and Servo Machines appeared first on Best Cheap 3D Printers.
]]>
3D Printed Servo
Using your 3D printer you can create servo mechanisms to produce controlled movements. This is a very interesting and exciting field of science that makes you feel fulfilled with what you learn and make. Use your creativity and think about more and more possibilities that you can create combining 3D printing with servo mechanisms and electro-mechanics.
The post starts with an interesting video with some examples and continues with another video on how to build these kinds of machines.
We don’t intend to speak about the definition of a servo mechanism but if you require more information, you can use the following links:
3D Print Servos
In this video, RCLifeOn youtube channel is using the following 3 mechanisms from thingiverse to create the machines.
3D printable robotic arm claw gripper
Linear actuator for mini servo (11-20gr)
It’s really interesting. Sit relaxed and enjoy it.
How To Make A 3D printed Servo Mechanism
Roger Rabbit youtube channel has prepared the following interesting video on how to create the mechanisms.
You can download the Solidworks and STL files from the following address:
Enjoy watching the video and making this interesting mechanism.
Where to buy Servos?
In Amazon , you can find a variety of servos with different torque capacities and varuios applications including RC Robot cars and helicopters. You can also find a range of the components related to servos including servo gears, arms, cases and mounts there.
Click Here to see the different products and check the prices.
Bottom Line
In conclusion this small post is showing how you can extend the variety of your 3D printed parts by using your creativity and combining 3D printing with other different fields of science.
In the future posts we will see more of these examples and applications.
See you there soon.
The post 3D Printing Electro-Mechanical and Servo Machines appeared first on Best Cheap 3D Printers.
]]>The post Insert Metals Into Your 3D Prints appeared first on Best Cheap 3D Printers.
]]>
Do you want to add more variety and functionality to your 3D printed parts? In this post we learn how to produce Metal-Plastic combinations. The metal parts can play the role of a connecting element for example a bolt or a nut in a knob.
Or they can add strength to the functional surfaces of our plastic parts for example brass bushes inside the holes. We can insert magnetic elements to our plastic parts and use them for example to stick to some surfaces or for sorting them.
Methods of Metal-Plastic 3D Printing
We focus on two different methods and watch a number of examples that are presented in the following youtube videos.
These methods are :
- Design Method: Design your model with appropriate geometry for metal ( or non-metal ) insert and consider a pause in its 3D printing process for adding the insert to the part.
- Thermal Element Method : Using heat to enter metal inside the holes of the plastic part.
Each one of the selected videos includes a number of very helpful and important points and resources. By watching all of them we can gain a very good view of how to perform this task completely and without problem.
We try to mention the important parts before each video.
Now Relax and enjoy watching them…
1: Design Method
1-1: Inserting A Nut In A Knob
In this video Chuck from CHEP 3D Printing & Electronics Youtube channel beautifully shows how we can create a spare, out of a sample part and guides us through all the following steps to :
-
Scan the part with a 2D simple scanner and produce a 2D image from the main side of the part in .jpg or .PNG formats.
-
Use an image editing software ( like Instant Alpha in Macs or GIMP for windows ) to remove the background from the image and trim the excess details , and eventually change it to a format which is usable by 3D modelling software. ( SketchUp)
-
Use an online free .PNG to SVG converter.
-
Complete the model with 3D modelling software and add the appropriate interior hole for inserting the nut. Save the model to .STL format which is usable by 3D printer.
-
Use the Slicer software to Slice the model
-
Print up to a height to stop the printing process and placing the nut in the plastic and then resume the print to complete the part.
Note: Chuck is using a feature in a da’Vinci software to pause the print and resume from the last point of pause after putting the nut in. This pause could be easily programmed using a plugin in CURA free software. ( Click Here to see how!)
Chuck is a great teacher. Now watch this interesting video and enjoy it….
There are still more helpful and important points to learn so continue watching the rest of videos below.
1-2: Insert A Nut In Your 3D Print Using CURA
In this interesting video DIY3DTECH.com youtube channel is using Tweak at Z 4.2.0 plugin (Pause at height ) in CURA to set the appropriate pausing height for inserting the nut.
If you want to know more about this useful plugin in CURA, please click here.
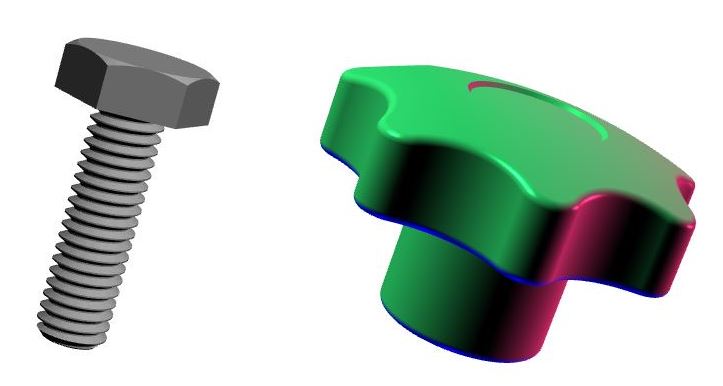
1-3: Insert A Hex Bolt Into A 3D Printed Part
This interesting video has been prepared by CAPINC you tube channel.
He introduces McMaster-Carr website that has a big library of mechanical parts and allows you to download the solidworks model of most of the parts. So if you are using solid works, now you have access to a big and invaluable source of the parts and drawings. Actually you can find a wide range of file formats including DXF and DWG.
He finds the file for a bolt that he wants to insert into a 3D printed knob.
Like the previous videos he makes some slight changes in the knob model and locates the pause height.
There are two important points here:
- Spray a layer of an anti rust material on the outer surface of the bolt. That helps the molten plastic to adhere well to the bolt.
- Make sure that the top of the hex head of the bolt sits below the horizontal line of the last layer before pausing. Why? To prevent the extruder head to hit the top of the bolt after resuming the printing process.
2: Thermal Method / Put Threaded Metal Inserts In Your 3D Prints
2: Thermal Method / Put Threaded Metal Inserts In Your 3D Prints
2-1: Using Heat or Press Fit Elements
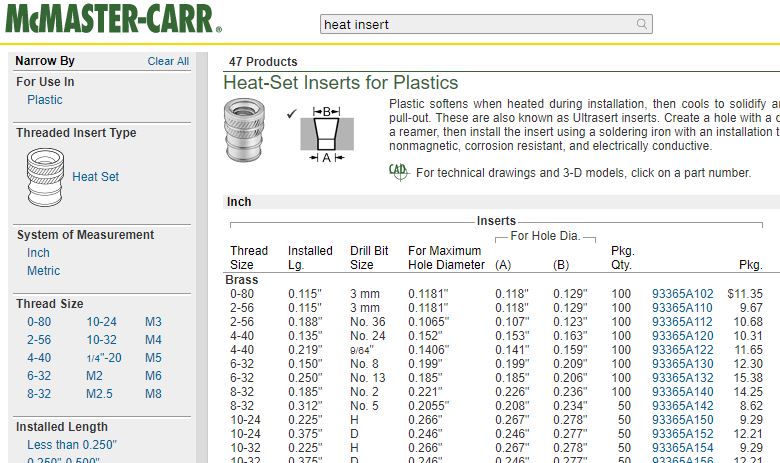
Heat insert
In this interesting video David from CAPINC youtube channel is showing how to insert metal parts in a 3D printed part using heat . It’s easy and useful.
He uses Metal Heat Inserts for the plastics from McMaster-Karr website.
Point 1: In each McMaster-Karr product page you can find the maximum hole diameter that is appropriate for each insert. You can use this diameter when designing your part with 3D modeling software. Generally before you buy the brass inserts make sure that their outside diameter is slightly bigger than the inside diameter on your 3D printed plastic parts.
Point 2: He introduces press fit expansion inserts in McMaster-Karr website. With special shape that these parts have they don’t need heat to go inside a whole and then after you fasten a bolt in them their outside diameter will expand and create a good press fit with the plastic part.
Now relax and enjoy this video….
2-2: Some More Points on Thermal Inserts
Now we pay attention to some more points from the following video from MakerBot youtube channel.
Point 3: To prevent overheating, make sure not to complete inserting the parts all through their lengths in just one run. Do for example around 80 percent in the first run and then complete the rest of it in the second run.
Point 4: When fastening the bolts inside the inserts be careful and do not over tighten the bolt. This can break the plastic surrounding the insert and ruin your 3D printed part.
2-3: Levelling the Inserts inside plastic 3D Print
You may ask yourself,”How can we make sure the top of the insert is at the same level as the top of the plastic?”
Point 5:The following video from tgammoncad youtube channel is showing a very interesting and easy way to do it. He inserts the metal up to 80 percent of the length inside the plastic and then while the metal insert is still warm presses it to the flat surface of his desk until the inserting is complete. You can also do this by having a (metallic or wooden) flat surface available and just press it with your hand on the insert until it goes completely insider the plastic.
Now enjoy watching the video….
Useful Links
Press-Fit Inserts for Plastics
Bottom Line
Now we have found more opportunities to build parts with more and better functionalities. With inserting metals in your plastics you can create mechanically stronger parts.You may need wear resistance in your plastic parts and adding an appropriate metal part can provide it for you. You may need some magnetic properties in your 3D printed parts.
Use your creativity to find more and more opportunities. Isn’t it exciting?
See you soon in the future posts.
The post Insert Metals Into Your 3D Prints appeared first on Best Cheap 3D Printers.
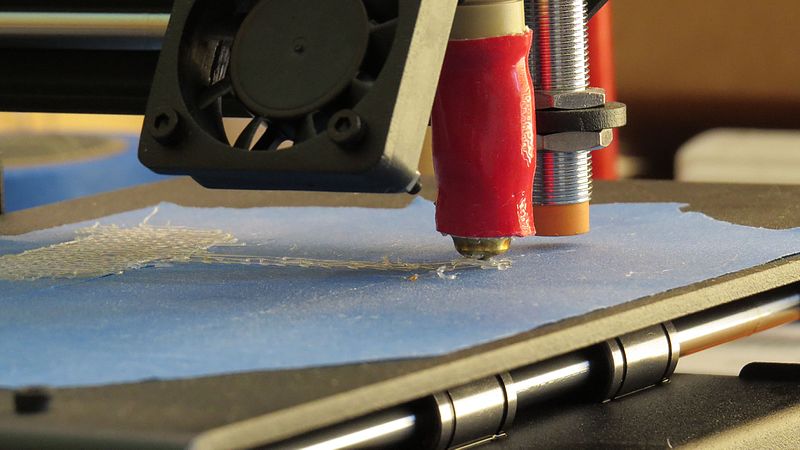
]]>The post First Layer, The Foundation Of Your 3D Printing appeared first on Best Cheap 3D Printers.
]]>Now let’s get down to the business and discuss this vital factor …
Some Symptoms and their resolutions
In the following video, doodaddoes you tube channel discusses about some first layer symptoms , causes and their solutions. The following diagram shows a glossary of what he has explained.
You can visit posts about E-Step and Resolving The Mesh Errors, if you need more information about these subjects.

First Layer Issues (Symptoms, Causes and Resolutions)
Before doing anything please just make sure :
- the temperatures of the nozzle and bed are set correctly
- the bed is in good working order or clean it
Now enjoy this interesting and helpful video…

First Layer Settings On CURA Slicer
Settings In The Slicer For The Best First Layer Quality
In the following video, Maker’s Muse You tube channel is discussing a number of the parameters that we can tweak in our Slicer Software to improve the quality of the the first layer. Among the different parameters Angos is focusing on the following parameters:
- First Layer Settings ( height, speed and width ( the amount of material feed))
- Cooling Fan Speed settings for the first layer
- Using Skirts / Brims and Rafts
The settings he is showing is related to Simplify 3D software and the same settings can also been found on CURA software which is free. This image is related to CURA ( Version 15.04 )
Some Useful Links
3D Print First Layer
Print Quality Troubleshooting Guide
Repair Your File To Create Seamless 3D printed parts
Do You Feed Appropriate Amount of Material Into Your 3D Printer?
3D Printing Multiple Processes in Cura
Bottom Line
Now we have moved another valuable step forward in 3D printing knowledge. Knowledge is power and now we are more powerful. We can save a lot of time, material, energy and money with just considering the above points before starting to print.
The post First Layer, The Foundation Of Your 3D Printing appeared first on Best Cheap 3D Printers.
]]>The post Use Your 3D Prints to Cast Metals and Non-Metals appeared first on Best Cheap 3D Printers.
]]>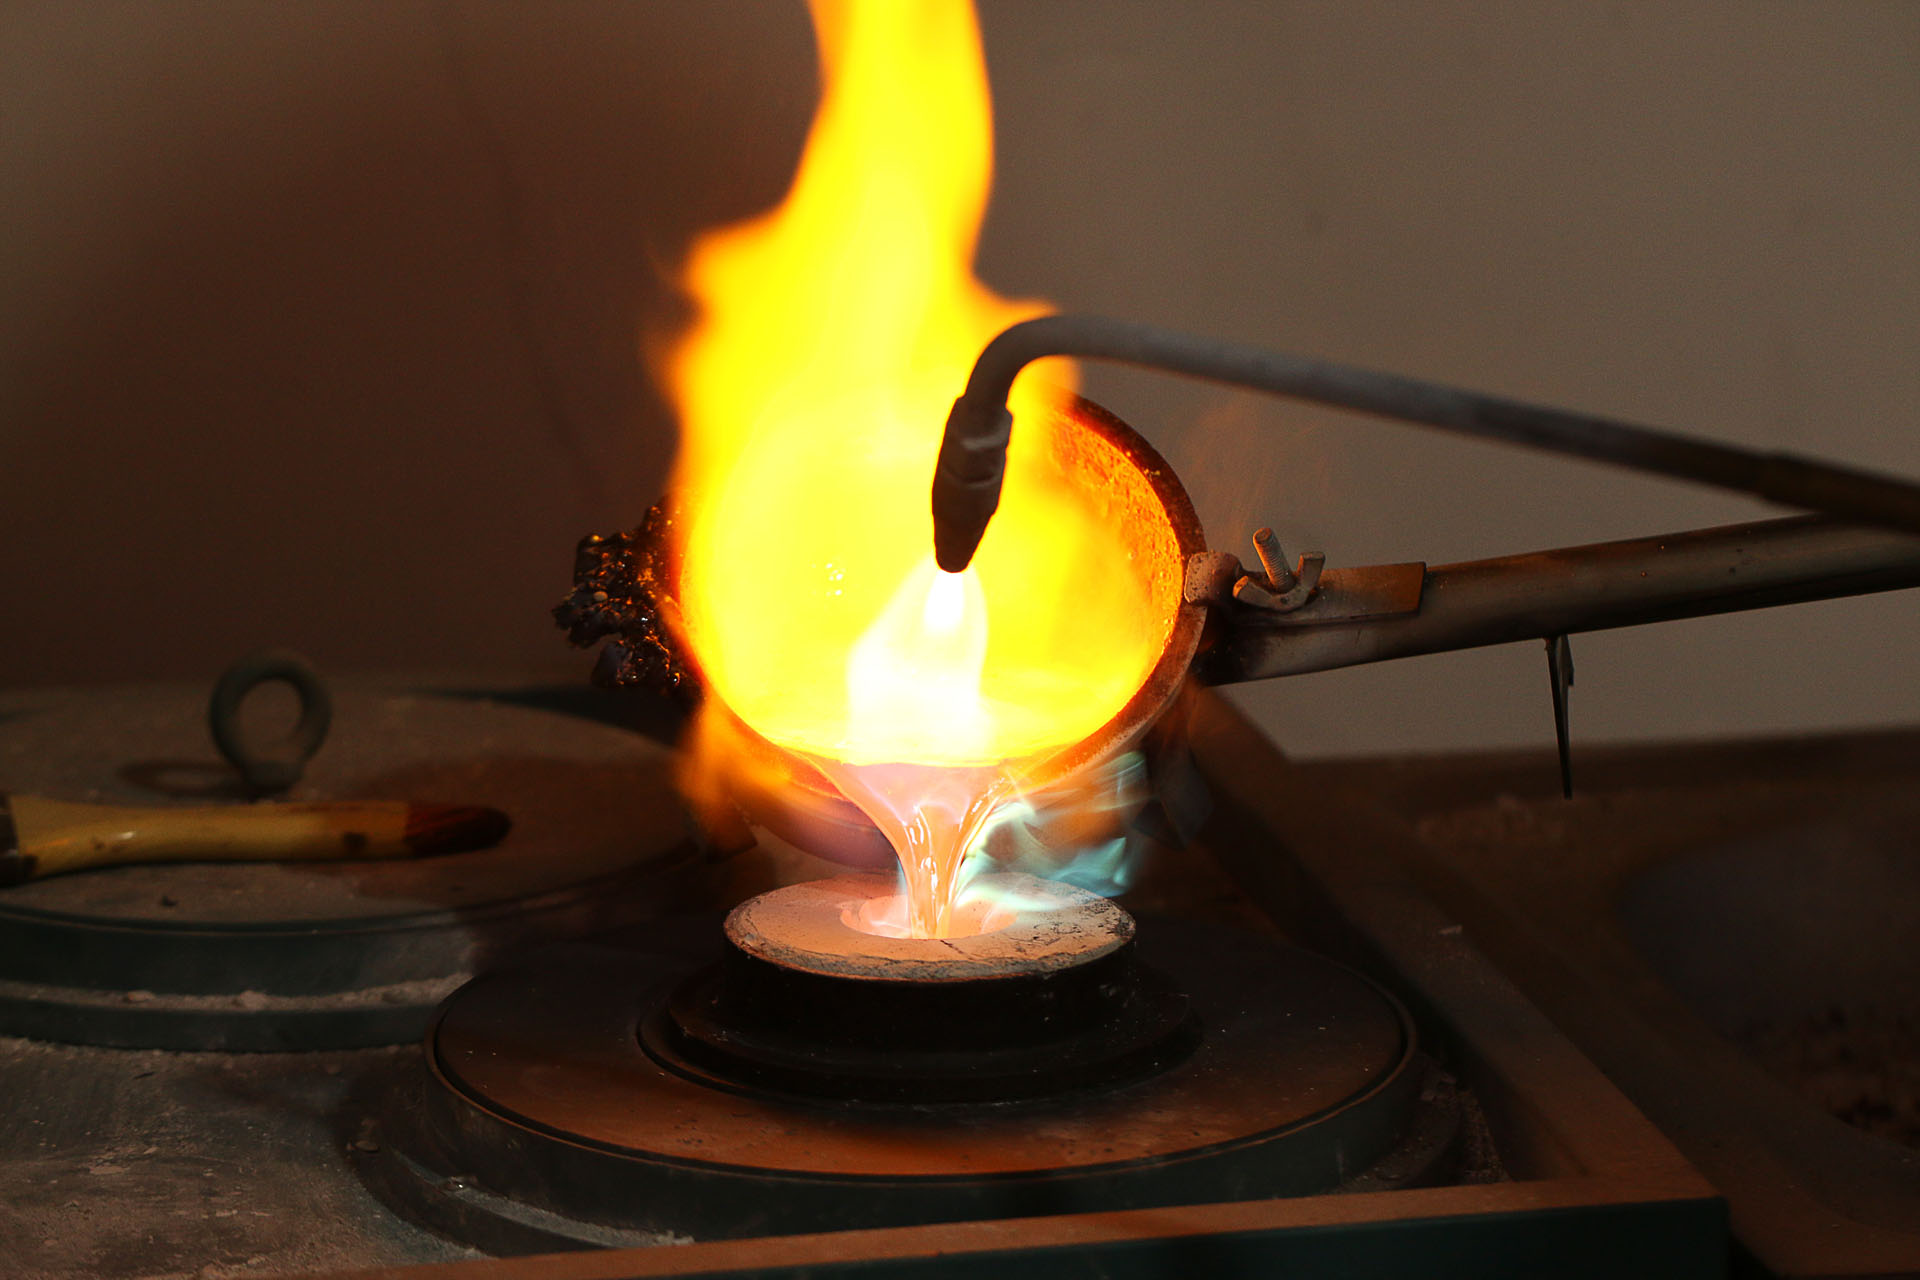
Lost_wax_casting ( Wikimedia)
Use your 3D printers to create metal parts. It’s really exciting!! Isn’t it? In this post we are looking at some practical examples of using 3D printing in other manufacturing methods. Combining the ideas in these videos you can think of mass production of parts with the help of your 3D printer. Totally we will watch 4 videos in this post that cover the following topics:
- Lost Polymer Casting
- Low temperature Metal Casting (Reusable Mould)
- Cold Casting
- Use a Reusable Silicon Mould To Cast Plastic Parts
Lost Polymer Casing
In this video Peter Alaric shows you how to create real metal parts with the help of our 3D printed parts. It may take some time but you produce a part that is mechanically much stronger, and functions better. Using multiple 3D prints in multiple moulds enables us to produce several parts in a shorter time and this means a production with higher speed.
Relax and enjoy this interesting video…
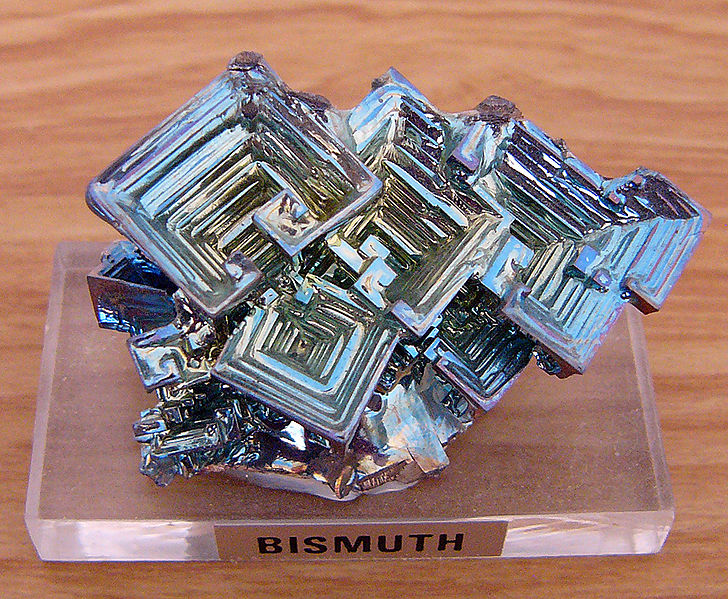
Bismuth Crystal
Low temperature Metal Casting (Reusable Mould)
Chris DePrisco is showing us how to use Silicon rubber to make a reusable mould to cast the metals with low melting point temperature.
You may ask, ” Is it possible to cast a metal in a polymer mould?”
He is using Bismuth-Tin alloy as the metal with melting point at 138 ̊ C ( 281 ̊ F ) and Alumilite’s High Strength 3 Kit ( 205 ̊ C ) to make the mould.
Note to the points that he mentions during the video.
Why is he using the primer and the top coat before casting?
Air bubble is something you’d like to prevent because they create holes in your Silicon rubber mould which in turn creates ugly tiny metal balls on the outer surface of your casted part.
He applies a thin layer of the Silicon to the outer surface of the master (3D printed) part with a paint brush. This is a very important step to prevent the air bubbles( pockets) on the internal surface of your mould. Think How?
There is another point that help you prevent air bubbles. Once the surface of the master has been covered, hold your mixed rubber high above one corner of your mould box and pour a small thin stream of rubber and slowly fill the box. The thin stream will burst any air bubbles as you pour it in the box.
Enjoy this interesting video and see how many important points you can extract from it.
Cold Casting
This method uses a very simple logic and it is mixing metal powders with some resins. Paul from Mold3D Channel is showing us how to create antique-like beautiful pieces of art .
You can create parts with shiny or rusty appearances and also with magnetic properties.
He has mentioned a lot of important and useful points that will make our work easier towards a beautiful result. So please note carefully!
Why has he used a bath of Alcohol ?
What brand of resin he is using and with what ratio of parts A and B?
How we can reduce the air bubbles in the resin and mould?
Mention some safety points when mixing the resins.
What is the ratio of iron powder and resin?
Why is he using mould release?
Continue asking questions and complete the points that Paul has mentioned in his helpful video.
You can see that with the way he is pouring the resin he could reach to a good quality in final part with a few small bubbles which are not so important. We need to copy this method for our castings to reach to the same level of quality or even better.
Use a Reusable Silicon Mould To Cast Plastic Parts
Watch and enjoy this interesting video from Smooth-On you tube channel. Don’t forget to write down the valuable practical points that are mentioned especially about the pouring method.
We can see that after preparing the mould the speed of manufacturing in this method is much more than a 3D printer. So this method could be a good option for mass production of the parts.
Isn’t it exciting?
Don’t forget to consider the production cost and quality.
Useful Links
Bottom Line
Now we have more knowledge on how to use our 3D printer to produce parts with higher quantities and more material variety. Mass production of plastic parts is something that we can think of it. It can mean less time spent for creating similar parts if we need them. It can also mean to us creating a business or more money.
I don’t know about you but I feel really excited about the extent of the opportunities that have opened in my mind.
With more knowledge, creativity also works better. Think more and find more opportunities…
See you soon in the next post.
The post Use Your 3D Prints to Cast Metals and Non-Metals appeared first on Best Cheap 3D Printers.
]]>The post Electroplating 3D prints appeared first on Best Cheap 3D Printers.
]]>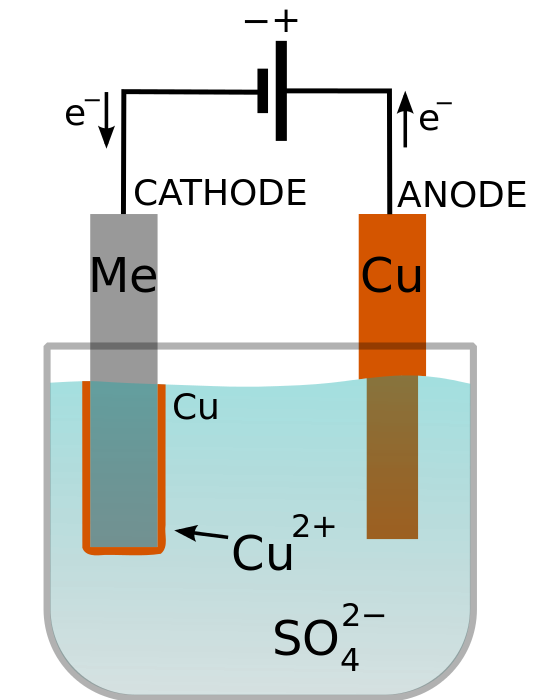
Electroplating Process (WIKIPEDIA)
With electroplating , we can cover our 3D printed parts with metallic coats and give them the shiny and beautiful appearance of true metals. Gold, Copper and Nickel are 3 of the most important metals we can use in this regard. We can think of setting up a good business with manufacturing the more valuable gold or metal coated parts.
The logic is really easy.
The Easy Logic of Electroplating
- Make your plastic part conductive to electricity
- Prepare the appropriate medium solution
- Connect the coating metal bars( Gold, Copper or nickel ) to the positive side of your electrical source and put it in the solution. (Anode)
- Connect the part that you want it to be coated to the negative side and put it in the solution(Cathode)
- Wait for the coating particles to separate from coating material bars and sit on your part
- Finally do the final finishing and fining
How to Make Your Plastic 3D printed Parts Conductive To Electricity
Barkus Labs youtube channel uses an interesting and cheap method to make a conducting mixture. They use a mixture of Acrylic Paint and Graphite fine powder to cover the outer surface of the printed part. Acrylic paint sticks to the plastic and graphite gives the electricity conductivity , creating a conductive outer layer on the 3D printed parts.
Now enjoy this interesting video.
Gold Plating Your 3D Printed Parts

Gold Plated 3D Print
Conductive Ink is another solution that comes to help us make our plastic parts conduct electricity. Note that conductive ink will not stick to the dry surface of the part. You need to apply a clear lacquer solution to dissolve the outer layer of the part and apply the conductive ink while the solution is not completely dried. This gives time to the ink to mix with the solution and dry together with it. After the layer mixture is dried an outer conductive layer will be created on the part.
The following video from Uwe Klinkmuller youtube channel helps us implement our Gold coating process step by step. It gives all the details to enable us to perform a complete coating job.
It’s really helpful and interesting. Enjoy watching it…..
Bottom Line
Now we have stepped another valuable and exciting step forward. Combining the 3D printing with electroplating we expect something more than just fun and creating beautiful parts. We are looking at creating more value out of our 3D printed parts. We can think of creating Jewels and valuable Gold or Silver coated artefacts.
Use your creativity and establish a successful business out of your 3D printing fun. Why should we limit ourselves just to the combination of 3D printing and electroplating. Think of the other fields of science and find out what valuable thing or service you can can present to the world.
See you soon in future posts where we’ll discuss on more applications of 3D printing.
I am really excited! What about you?
The post Electroplating 3D prints appeared first on Best Cheap 3D Printers.
]]>The post Repair Your File To Create Seamless 3D printed parts appeared first on Best Cheap 3D Printers.
]]>
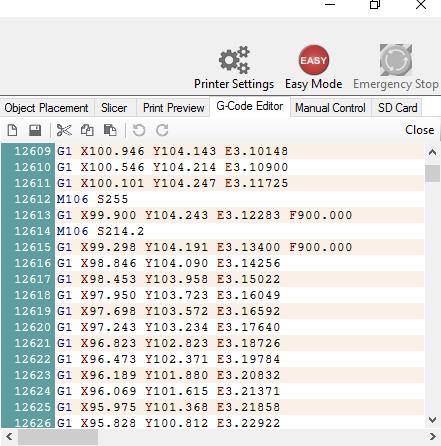
G-code preview
Find the issues and resolve them before they happen! Avoid the defects before they occur. Isn’t it exciting?
In search for the practical examples of 3D printing softwares, I found a number of really valuable resources, websites and Youtube videos. I am really excited to share them with you in this and future upcoming posts. Make sure to follow these series because they are full of important, vital and valuable practices and examples.
The focus of this post is on using 3D printing softwares to check, find and resolve the defects on your 3D models before you print the parts. I am sure, you can imagine the importance of this subject in creating seamless final parts and saving a lot of time, material, energy and money.
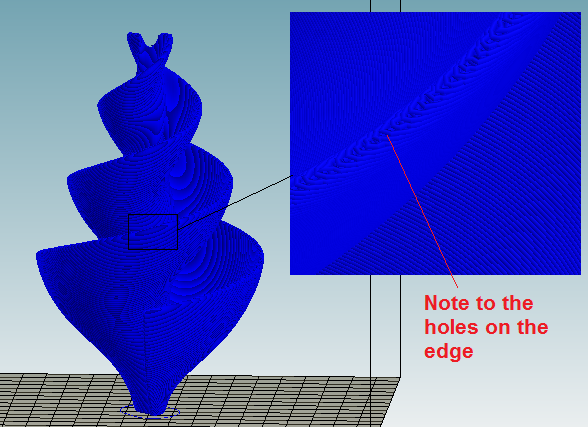
Check G-code Overview for Overhangs and Holes
Let’s start with a very interesting and helpful video from Makers Muse Youtube Channel.
In this video Angus explains how we can use a G-code preview of a complicated sliced model:
- for a primary check to see if the overhang supports on a model are enough and suitable. The automatic support generation of a software can’t always detect all the thin overhangs and some parts of the model might start printing in the mid-air, creating a mess and resulting a failed print. So a layer by layer initial inspection of the model helps us add more supports in the required points. The manual support creation of Simplify3D is really helpful in this regard.
- to examine the big areas with low slopes. This can cause the printed layers to fail to cover the area and create holes in the final part.
Now let’s enjoy watching this interesting video ….
Most Common Mesh Errors and How to Fix Them Using Meshmixer
An STL file is made up of a Polygon Mesh. This mesh is actually a group of triangles that define only the external surfaces of your part. Your slicer decides on how to arrange these triangles to make the mesh more similar to the original part. The more complex your model is, the more mesh errors can be created in this simulation.
The following video from Formalab is one of the most helpful videos I have ever seen. Many thanks to Jordan ( from Formalab’s customer success team ) who is helping us to understand , find and resolve some of the most important errors in STL files. This way we can avoid a lot of the the 3D printing issues before they happen in the real parts and save a lot of time, material and money.
He focuses on the following important mesh errors and their resolution by Meshmixer:
- Missing Faces
- Reverse Faces
- Interior Faces
- Zero Thickness
- Unattended Fastening
Now relax and enjoy the video …
And then make a note from it…..
Use Makeprintable App on Thingiverse To Resolve The Mesh Problems
This new and helpful feature in Thingiverse helps us find the common mesh errors like non-manifolds, intersecting geometries, thin walls and other issues.
Install Makeprintable App on Your Sketchup
Isn’t it excellent? We can now install this app on our Sketchup and use it to analyse the common model errors and resolve them.
Enjoy this video and make sure to use this excellent opportunity…..
More Resources and Websites
Definition of the common errors
Bottom line
We discussed the following 4 exciting subjects that with no doubt will increase our power in creating seamless 3D printed parts.
- Checked the G-code overview for overhang supports and issues
- Examined the models against common Mesh Errors using Meshmixer
- Introduced Makeprintable app in Thingivers.com website and used it to check the models against mesh errors
- Found how to install Makeprintable app on our Sketchup and make this free software more powerful
At the beginning of this post I told that I am excited to share these videos with you and now you know why.
In the future posts I will share more videos and resources on interesting and helpful subjects.
See you there, very soon!!
The post Repair Your File To Create Seamless 3D printed parts appeared first on Best Cheap 3D Printers.
]]>The post 3D Printing Programs appeared first on Best Cheap 3D Printers.
]]>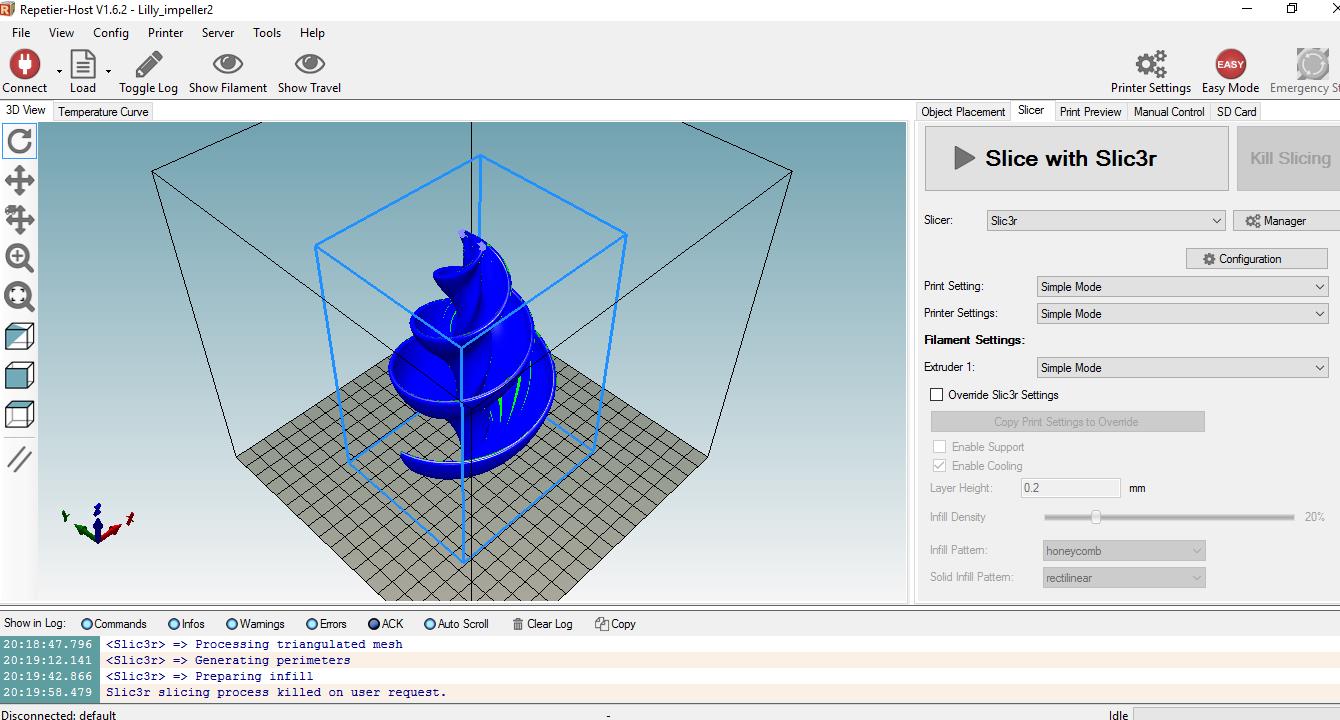
Repetier Host
In this post we will gain a clearer view about concepts like software, firmware, host program, 3D modelling software, slicer and their vital role in 3D printing world. This is another important and exciting step forward to become a 3D printing expert.
Table Of Contents
What is a software?
A software is a program written to control and manage the functions of a smart device or machine, or another program.
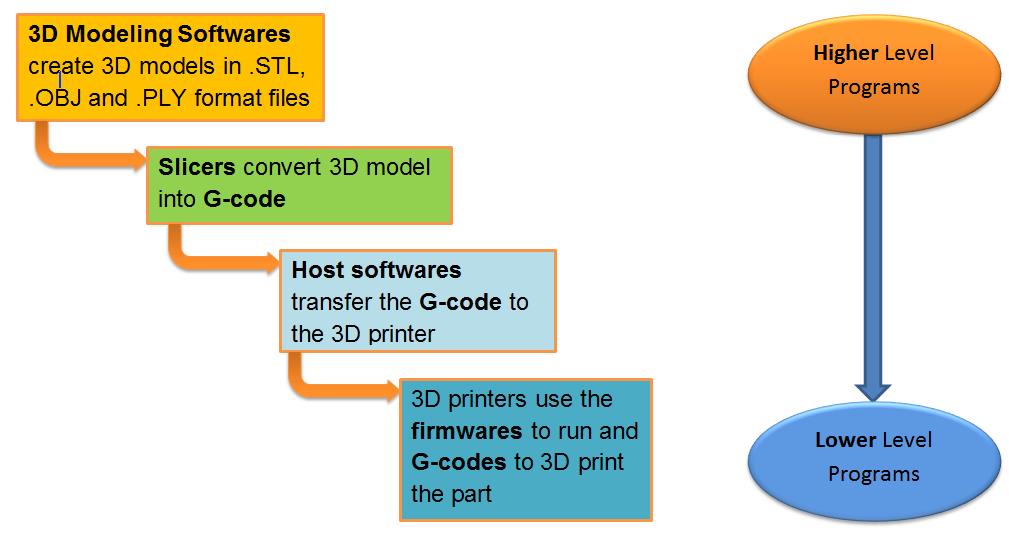
Softwares control machines in two different levels: Higher level and Lower Level.
The higher level is related to the controls that are performed from outside of machine for example by the operator or user of the device. Examples of higher level programs are 3D modeling softwares and G-codes.
The Lower Level programs perform the control of the device on itself. The example of a lower level program is the firmware of a 3D printer.
Human vs Machine language programs
Consider your 3D printer as a machine that speaks with its own special language.
From Human Created Model to Machine Printed Part
It doesn’t understand your language. To make them realise what you are saying, you need to translate your words into their language. It’s a simple logic. Isn’t it?
To perform and complete this simple logic we need to follow a sequence of steps. In other words a number of programs work in the way to enable us create a 3D model and bring it to the real physical world as a printed part. These programs are :
- 3D Modelling softwares that help a 3D model be created by a human or a 3D scanner and convert it to .OBJ or .STL files that are usable by the 3D printers.
- Editor Programs that help us view a defective (.STL) file and repair the defects.
- Slicer Programs that slice the 3D model to layers and convert the .STL file to G-codes.
- Host Programs that transfer the G-Code file from your computer to the 3D printer. These programs can monitor the functions of the machine and enable you to perform a real time control on your 3D printer.
- Firmwares that run the 3D printer and without them our device can’t work .
3D Modelling Softwares
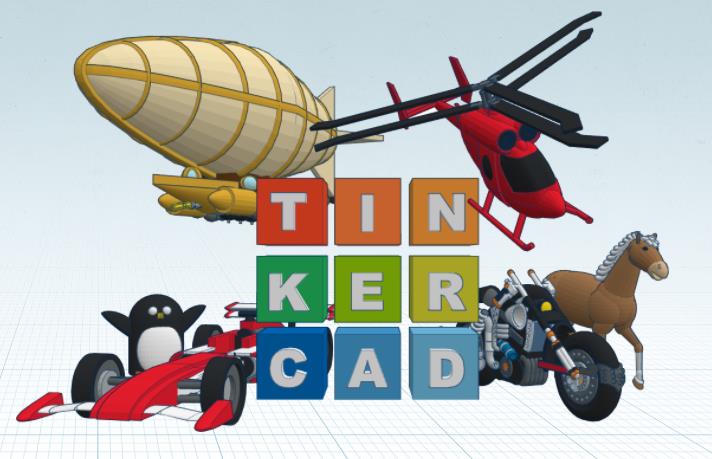
Tinkercad
There are lots of 3D modelling softwares available.
Below you can find 3 of the popular and free ones:
These days most of the 3D modelling softwares produce file formats that can be used by 3D printers.
Let’s watch the following video from CHEP 3D Printing youtube channel. There are a lot to learn from this interesting video in which Chuck beautifully starts from a need for a spare part at home. He goes all the way through to:
- creating a scan from the part
- using TINKERCAD to create a 3D model and .STL file format
- slicing and sending it to his 3D printer via a Slicer program called XYZWare.
- And finally he creates the final printed spare part using his XYZPrinting da Vinci 1 Pro 3D printer.
More advanced 3D modelling softwares
For more advanced designs and capabilities you can use more powerful softwares, Solidworks and Fusion 360 being two of the most popular ones. They provide you with a lot of advanced tools to easily create complicated 3D models.
Enjoy watching the following videos from Solidworks and Autodesk youtube channels that introduce a number of tools and features among the infinite capabilities of these professional and excellent softwares.
Solidworks
Fusion 360
3D Model file formats
3D modelling softwares create their outputs in graphical file formats including .STL, .OBJ and .PLY.
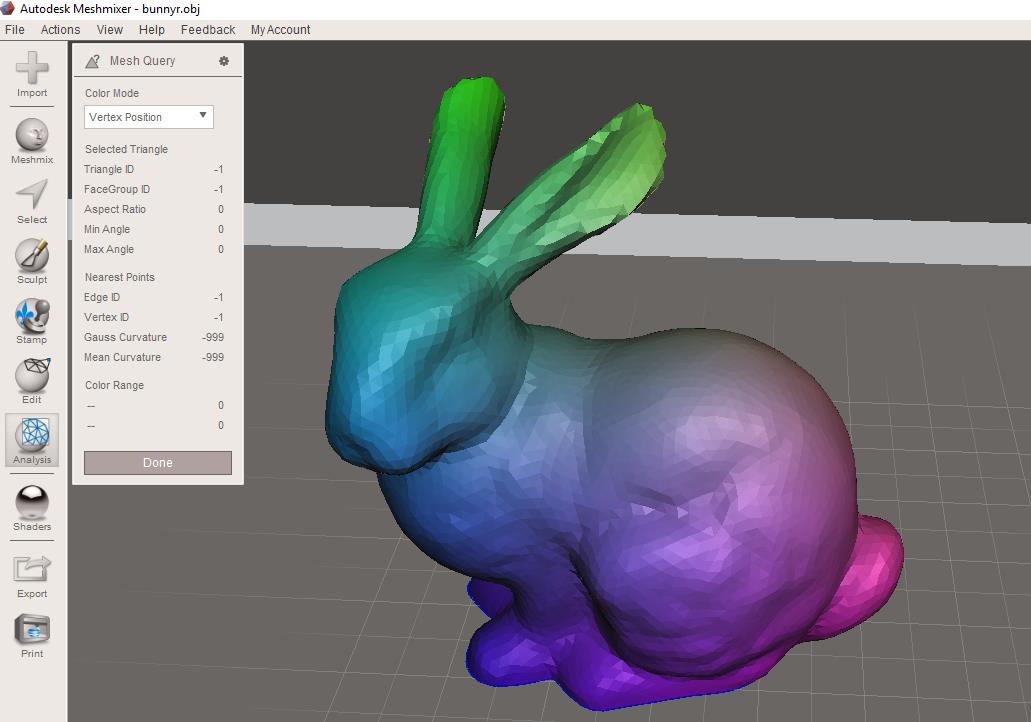
Meshmixer .STL editor
The .STL file type is the most commonly used 3D printer file type. Some 3D printers use their own special file formats. In this case you will need to change other file types to that format to be usable by that machine.
.STL was designed by 3D Systems for Stereo-Lithography CAD software.
This file format is supported by many other softwares and is widely used for rapid prototyping, 3D printing and computer-aided manufacturing (CAM).
STL files describe only the surface geometry of a three-dimensional object without any representation of color, texture or other common CAD model attributes.
.OBJ file format is a simple data-format that shows the geometry but with an added component of texture.
This file format was created by Wavefront Technologies for its Advanced Visualizer animation
Meshmixer-Menu
software.
It is a commonly used 3D modeling file format and many design software exports to OBJ.
It is also common in 3D printing and most 3D printers accept OBJ as a printable file.
PLY is known as the Polygon File Format or the Stanford Triangle Format.
It simply defines an object as a list of flat polygons.
This file format was initially created to store three-dimensional data from 3D scanners. It needs to be imported into design softwares before sending to a 3D printer.
It accepts more properties and attributes of an object including color, transparency and texture.
STL and OBJ File Editors
Some .STL and .OBJ files are not perfect and have defects. ( Whether you downloaded them from internet or created them in a 3D modelling software)
Defective files will cause faulty parts and problematic printing processes.
You can view and repair your STL files using a STL Editor Program.
Do We Have to use 3D Modelling Softwares?
Using a 3D modelling software is a real fun, but you don’t always need to use them to create what you want. You can find a large number of useful and interesting models and projects in thingiverse.com.
Repetier Host G-code Editor
Machine language (G-code)
G-code is a common language in Computer Aided Manufacturing (CAM).
3D printers as a type of the CAM machines understand and use this language to create parts.
Note that the G-codes are not the same as firmwares. We will discuss about this later on this post.
G-code is a numerical control programming language and is quite simple to learn and use. You can write your own G-Code but you should have enough experience to write a good one.
Mostly we can load the created G-code into the 3D printer :
- via a USB memory card or
- using a the 3D printing host softwares (like Repettier Host or CURA ) and via a USB cable
G-code editors
With these programs you can check the G-Codes and edit them for applying changes or solving the possible issues.
Here you can find a good information page about the G-Code Editor on Repetier-Host software.
You can download this free and popular program here.
The following video can help us read and understand the different G-code commands and their functions in a 3D printer.
Now we can discuss about the bridge between the Human language ( 3D Model ) and Machine language ( G-code), ….
I mean a Slicer ….
Slicer and Host Softwares

CURA
A slicer acts like a language translator. It converts human language ( 3D Model in .STL format ) to machine language ( G-code).
The slicer software also takes your 3D model and slices it up into layers.
Slicers also:
- generate the extruder paths
- calculate the amount of material to be extruded
Below you can find a number of popular and free slicer softwares:
Host programs transfer the G-Code file from your computer to the 3D printer. These programs help you monitor the functions of your device and enable you to perform a real time control on your 3D printer.
These days the slicers and hosts are integrated into one program , CURA and Repetier Host being two examples of these integrated programs.
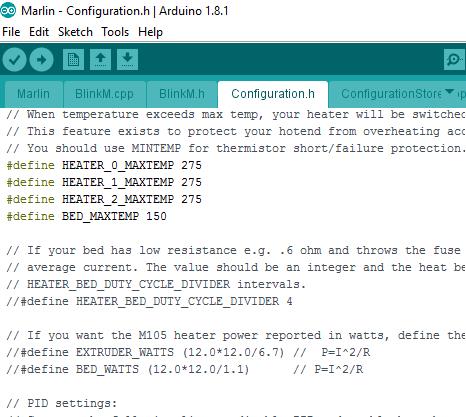
Marlin Firmware on Arduino
What is a firmware?
Most of us tend to think that a device or hardware works by itself. But it’s important to know that most of the smart devices aren’t able to function without a software that is specially written for them and saved directly onto their internal memory.
Consider all the intelligent and smart devices including (motherboards of) computers, modern cameras , cell phones, modern smart home telephones, automation system of a building, smart home heaters, smart car aircon systems, USB flash memory cards, and even the remote control of your TV and your computer mouse . All of them have a software embedded into their internal memory.
Without this software they are not more than just a piece of stone.
This software is called a firmware.
As a comparison, while firmwares govern a range of vital functions of hardwares, the computer operating systems take over the activities of the installed softwares and applications.
What does a firmware do?

Non-Volatile Memory
This software lets the devices wakeup when they are plugged in to the electricity and/or the start button is pushed, and detect the peripherals. A firmware, like ROM BIOS of a personal computer, controls only a limited range of vital functions of that device while in other devices, it could be the only program on that system and perform all its functions.
Both operating system and firmware do part of the control of a device but firmware provides the Low Level Control .
Without a firmware your 3D printer cannot turn on and its controller is unable to detect the stepper motors, the hot-end heaters, the bed heater, temperature sensors and the LCD screen.
Where is a firmware stored?
Firmware is written and saved directly into special kinds of memory inside our devices.
These memories are non-volatile memory devices such as ROM, EPROM, or flash memory.
A firmware is not deleted when the device is turned off or unplugged from the electricity. We don’t want to lose the firmware when the device is turned off otherwise it will not work again!!!

3D Printer Controller Board
3D Printing Firmwares
A 3D printer firmware runs on the main controller board of the machine and controls all its real-time activities. It manages the functions and communications between steppers motors, head and bed heaters, temperature sensors, LCD screens and etc.
Click here to find a list of the active 3D printer firmwares. You can also find valuable information about their features, Electronics compatibility and links to download the firmware and related documentations.
Amongst this list you can find very famous softwares Marlin and Repetier-Firmware.
Useful Links
Firmware
http://www.reprap.org/wiki/RepRap_Firmware
Cura
https://www.youtube.com/watch?v=9coPHC04QZw
https://www.youtube.com/watch?v=u-wNzrKV6Zw
Mastering Cura (Processes)
https://ultimaker.com/en/resources/21932-mastering-cura
G-codes
MOST USEFUL 3D PRINTER G-CODES -Repetier Host
Free G-code simulator ( CAMotics)
How to use Repetier Host – The Basics and G-Code
Conclusion
Now we have a better understanding of some more tools, their capabilities and roles in the 3D printing world.
By tools we mean, Programs!
Congratulations for another valuable and important step that helps you gain a better vision in your 3D printing work.
But our way in 3D printing softwares has just started. We have a very exciting, challenging and rewarding journey with tones of invaluable experiences and outcomes in front of us.
Now we have access to a lot of free tools that help us step inside and act. We can find a lot of resources, links and videos to guide us all through the way to our success.
So what is keeping us from acting? Let’s start, act and enjoy touching the success!
See you again in the next posts where we will find some more practical examples of how 3D printing softwares can help us improve our works.
The post 3D Printing Programs appeared first on Best Cheap 3D Printers.
]]>The post Upgrade Your 3D Printer For Advanced Functions appeared first on Best Cheap 3D Printers.
]]>Some of the upgrades in this page are just for the 3D printer kits and if you receive a 3D printer that is fully assembled they may already have these upgrades on.
Table Of Contents
Some Important Upgrades
Upgrade 1:
Auto Bed Levelling
Depending on the type and brand of your 3D printer, you need to level its printing platform every 10-20 prints. Manual bed levelling is a time consuming process. With an auto bed levelling system you can get rid of this manual process and perform it easily in shorter time periods and with more accuracy.
In the real world Auto Bed Levelling is not really levelling the bed. Actually it is done by a levelling probe that measures the vertical distance between the printer head and the printing platform.
Brook Drumm and his team in Printrbot have prepared the following interesting video. They have managed to print on a sloped bed plate using an auto bed levelling system.
Table Of Contents
Table Of Contents
If you have a 3D printer with auto bed levelling that’s OK but if your machine doesn’t have this feature it’s absolutely better to add it to your machine.
GuruBrew Youtube channel has prepared the following video on installing and using the auto bed levelling system on a 3D printer. It’s helpful and interesting. Depending on the hardware, firmware and the type of the sensor that you choose the method could be different.
Table Of Contents
Table Of Contents
Upgrade 2:
Improving The Motion Accuracy
You can design and add some components to your 3D printer to get rid of loose connections and backlashes between the mating and moving parts on your machine. These upgrades improve the motion accuracy of your 3D printer and enables you to create more accurate parts.
You can also find helpful points on ” How To Fine Tune The Output Of Your 3D Printer” for better accuracy.
The following video from Tech2C youtube channel shows a good example of this kind of upgrade. Please note that these upgrades are for Prusa i3 and depending on your machine you may need different actions.
Table Of Contents
Table Of Contents
Upgrade 3 :
Adding A Heated Bed For Printing ABS
If you print ABS on a 3D printer without a heated bed, the part will most probably warp or detach from the print bed. So if you want to print more advanced materials including ABS then you need to add a heated bed to your machine.
Thomas Sanladerer has prepared the following video. It’s really informative and helpful. Enjoy watching it.
Table Of Contents
Table Of Contents
Upgrade 4 :
Extra Power Source For Heating The Bed
A heating bed spends energy and adding it to your 3D printer requires you to add a power source to your machine. Otherwise you will need to wait for a long time for both 3D printer head and bed to warm up.
So organise to add a separate and appropriate power source to feed your heating bed.
Table Of Contents
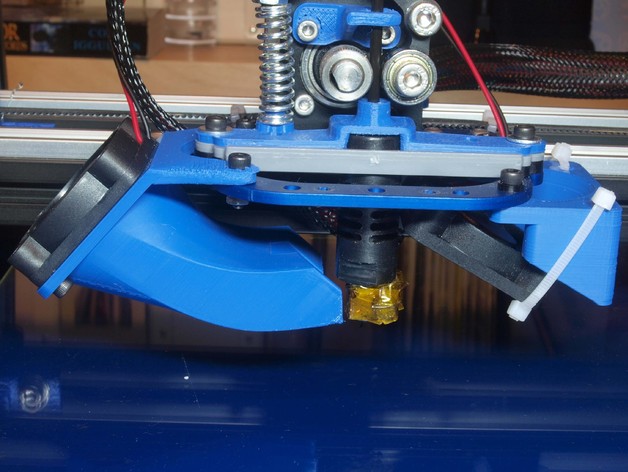
Part Cooling Fan
Upgrade 5:
Adding A Fan For Cooling The PLA Parts
On the post about “Improving The Quality Of 3D Printing By Cooling Fans” we saw that for improving the quality of PLA parts we need to have separate cooling fans blow to the printed part.
This is a very important upgrade for your 3D printer but remember that you should not use it for ABS parts.
You can find valuable and interesting ideas and designs about part cooling fans in thingiverse.com.
Table Of Contents
Upgrade 6:
Use A Raspberry Pi
Using a Rasberry Pi and running OctoPrint on it, you can have a strong control
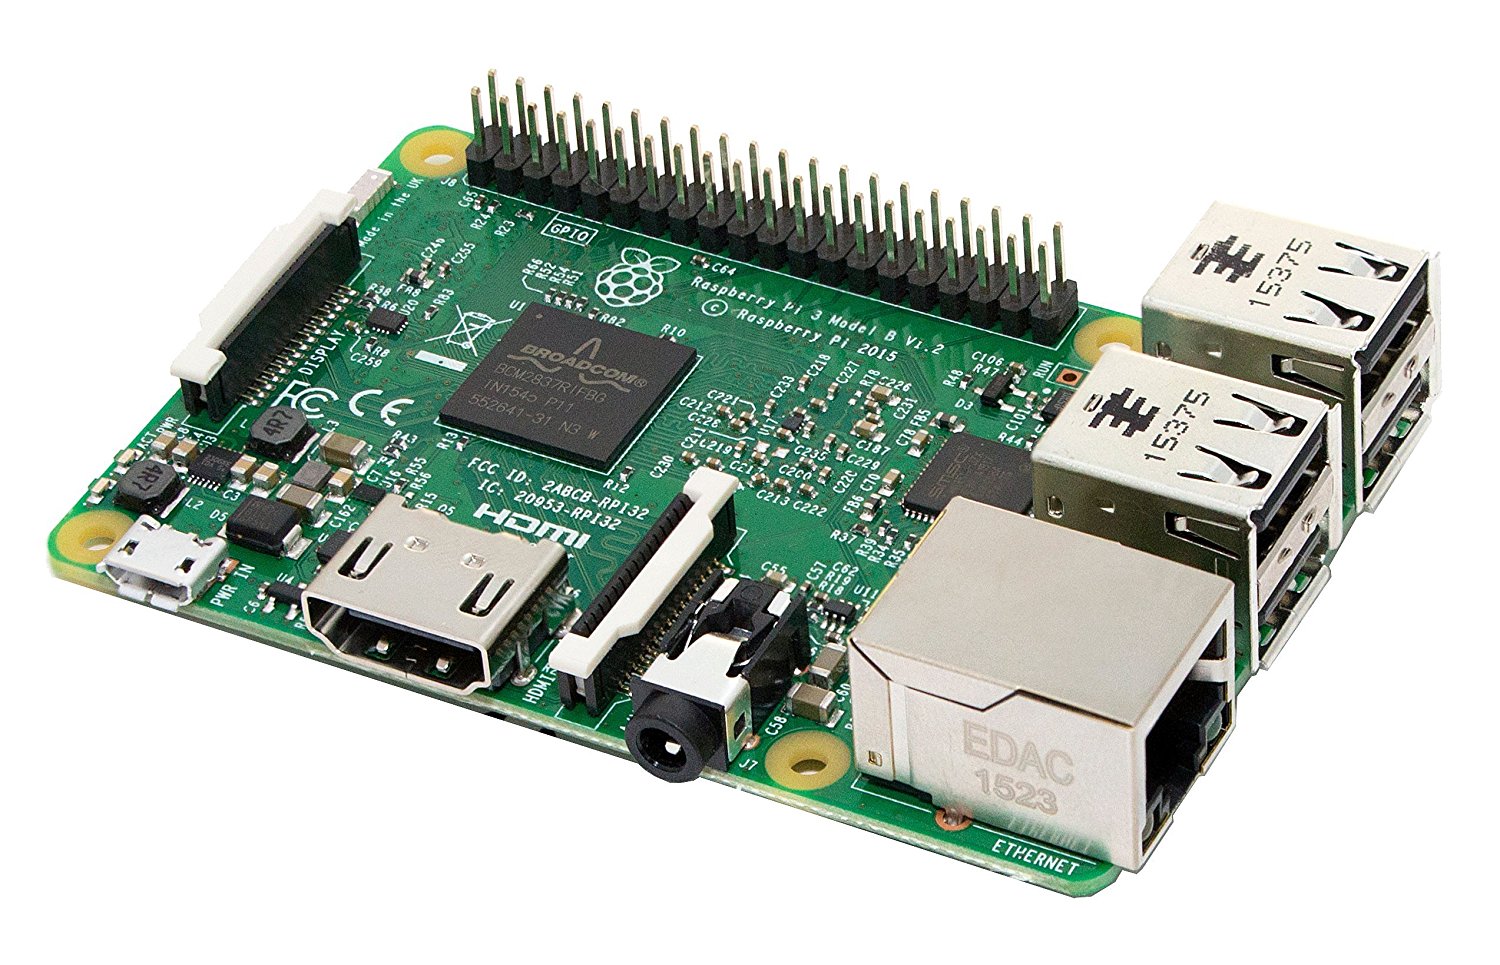
Raspberry Pi
on your 3D printer remotely through your computer.
- Raspberry Pi connects your 3D printer to your local ( wireless ) network. So you don’t have to move a SD card in and out to transfer the files or attach a PC to your printer with a USB cable. In other words this device turns your 3D printer to a network device that you can remotely access it.
- You can control all the parameters of your 3D printers with any computers, phones or tablets that are connected to the same network and through WIFI.
- Thanks to the plugin systems, now you can widely expand the functionality of the Raspberry Pi and as a result your 3 printer.
Isn’t it exciting?
- Connect a webcam to your Raspberry Pi and create awesome timelapse recordings of your prints. You can also watch your 3D prints without being close to your 3D printer at any time.
- Have notifications about your printing job progress
To see more features on OctoPrint and download it for free Click Here .
Rasberry PI is very cheap and you can easily buy it from Amazon.
Thanks to Extruder Joe Youtube Channel for the following video about Raspberry Pi. It’s really helpful and interesting. Enjoy it!
Table Of Contents
Table Of Contents
Upgrade 7:
Build An Enclosure For Your 3D Printer
Some materials including ABS are really sensitive to temperature changes and unwanted air flows. So having an enclosure for your machine will improve the quality of the ABS parts a lot.
It also reduces the noise level of the machine which is a very important factor especially for a machine that works for long times.
Table Of Contents
Upgrade 8:
Find The Appropriate Spool Holder
A Spool Holder is a wonderful upgrade for your 3D printer . A good spool holder prevents filament snags and helps a smooth flow material into your extruder. It considerably improves your print quality.
Depending on the brand and design of your 3D printer you can find a number of really good spool holder designs in Thingiverse.com. The following video from treborrrrr Youtube Channel is showing a low friction and interesting design of a spool holder.
Table Of Contents
Table Of Contents
Upgrade 9:
Use A Detachable Glass Printing Bed
Aluminium beds tend to get warped and dented in contact with heat . Glass doesn’t have this tendency and remains flat. You can clean it much easier and the flatness and surface roughness is much better than aluminium beds.
A detachable printing bed helps you detach the part from the bed much more easily and reduces the possibility of printing platform to go out of level.
You don’t have to do a number of complicated and and expensive steps to have a glass printing bed. Just have the glass cut to the size of your current print bed and attach the glass on top of the printing bed with simple appropriate paper clips. That easy!!!
Table Of Contents
Bottom Line
Now we should have a bigger picture about the possibilities of machine improvement. This helps us improve our ability to create more accurate and more beautiful parts.
These possibilities are not limited to the ones introduced in this page. Depending on the machine and your demands, you can use your creativity and knowledge to add more advanced features.
Each problem is an opportunity for improvement. So don’t be afraid of 3D printing issues and think how you can upgrade you machine or method to avoid it. Thinking this way we become excited and energised by turning the problems into opportunities.
In the next post we look at some very useful resources about 3D printing problems and solutions.
We invite you to enrich this post with your comments about your experiences in improving the 3D Printers.
Table Of Contents
Useful And Interesting Links
Upgraded upgraded upgraded Hictop ( Many thanks to Crip Skillz.)
BLtouch Auto levelling (Many thanks to ANTCLABS )
OCTO Print Tutorials (Many thanks to Joe Mike Terranella)
The post Upgrade Your 3D Printer For Advanced Functions appeared first on Best Cheap 3D Printers.
]]>The post Multi-Colour 3D Printing appeared first on Best Cheap 3D Printers.
]]>But let’s first jump into the …..
Part 1 : Multi-colour 3D printing
1-1: Multi-colour 3d printing with single extruder
Even if you have a cheap 3D printer with single extruder you can create beautiful pieces of art in multiple colours.
The main logic is really simple.
- You start your print with a colour
- When you want to change it, just give a pause command to your machine
- Then change the filament with the one that should be printed next.
- You continue this method for as many colour changes that you need.
Relax and enjoy this really interesting video in which Tech2C Youtube Channel is using one of the plugins “Pause at height” in CURA software to implement the above logic.
Note to two important points:
- Pay attention to how he sets the Marlin firmware to lock the stepper motors while they are in the parking position for changing the filaments. You can do it using the Arduino software which is free. This is very important because you may accidentally touch and move the printer head while they are in park and as a result the next stage of your print will start from an incorrect position.
- After changing the filament let the remaining filament (from previous colour) be extracted completely from the extruder before starting to print the next colour.
1-2: Dual Extrusion, Dual Nozzle 3D Printing
Dual extruder 3D printers change filaments automatically . You don’t need to pause the printer and pull out the old filament, and then feed the new one manually. So in comparison to single extruder ones it saves a considerable time. In other words dual ( or multi ) extruders enable you to have filaments with different colours ready to be used whenever your 3D Printer needs them, and that’s why they save printing time.
Trial and Errors youtube Channel have prepared the following interesting video from a dual extruder 3D printing. Watch and enjoy it.
Two different nozzles can’t work independently and have the following disadvantages :
- The printable area decreases in comparison to single nozzle.
- The calibration of two nozzles in Z direction is difficult and sensitive. If a nozzle is a little bit lower than the other one, it can damage the printed part.
- The calibration of two nozzles in X and Y directions is difficult. If the position of the nozzles are not calibrated the colours will overlap on one side and lack on the other side.
- Oozing filament from idle nozzle which causes a mess.
Because of these disadvantages some creative experts prefer to use …….
1-3: Dual Extrusion with Single Nozzle
In this method you use the controller and stepper motors of a Dual extruder machine to feed different materials into a single nozzle using a “Y merger” or “Y Adaptor“.
Many thanks to ZKAZKA123 you tube Channel please watch this interesting video:
Waste Block
You can use a waste block to extract the remainder of the filament from the previous colour.
You can easily do it by putting a rectangle (for example 20mm x 20mm ) on one side of your model with lower Y. We set the height of this rectangle the same as the main model.
Since we have put this rectangle on lower Y direction it prints first on each layer. It allows the print head to start printing the main model with fresh filament.
1-4: More than 2 colours
You can extend your machine to print more colours by adding stepper motors, improving hardware and firmware. Please watch the following two interesting videos from Richard Horne and David Chang youtube channels:
3-way extruder and colour blending nozzle – Build up and Printed things
FDM multi- feed mixed color nozzle 5 in 1 out
1-5: Multi-colour 3D Printing using Diamond Hot-End
Following the goals of easy calibration, preventing oozing from dual nozzles and reducing the waste material, Diamond Hot End is designed.
It enables your machine to:
- print with at least 3 different colours and blending them.
- make colour shifts as fast as possible by using small mixing chamber in the nozzle.
- reduce the unnecessary material waste.
- heat up nozzle quickly because of compact nozzles
At this time, they have designed it for limited brands but they are trying to improve it to be used with all 3D printers.
Part 2: Colouring and Finishing 3D Printed parts
In order to create colourful beautiful parts, we don’t necessarily have to use a 3D printer to print filaments in different colours. In the previous post about “Make Your 3D Prints Shiny and Beautiful Parts” you found different methods about producing colourful and shiny parts without a multi-colour 3D printing.
Enjoy watching the following interesting video from Better Than Useless you tube channel. You can see that with really simple tools, some creativity and without complicated multi colour 3D printing methods you can create beautiful, colourful objects.
Bottom Line
Now we have a good vision of how to create colourful final parts.
Having a machine that enables printing in multi colours is a solution but couldn’t be the only and necessarily the best one.
If we just want to experience the joy of making and using the complicated machines that’s OK. It’s a really valuable technical experience and the feeling is great. You pass a very valuable learning curve in a short period of time.
But if you only want to create a part in colours you can do it with much easier and less expensive methods.
If you consider mass production of the parts you certainly should see much more facts.
Time and material wasted in a multi colour 3D printing could be considerable. Machine repair and maintenance is something that happens less in simpler 3D printers.
And the final word :
Relying on knowledge and creativity is the most important tool in each field of science and technology. 3D printing is not an exception. A knowledgeable creative person with a simple 3D printer can create much better parts than an ordinary guy with a complicated high-tech machine.
Some more resources:
http://hackaday.com/2016/10/03/maker-faire-multicolor-and-multi-material-3d-printing/
http://reprap.org/wiki/Diamond_Hotend
New technologies:
The post Multi-Colour 3D Printing appeared first on Best Cheap 3D Printers.
]]>The post Make Your 3D Prints Shiny and Beautiful! appeared first on Best Cheap 3D Printers.
]]>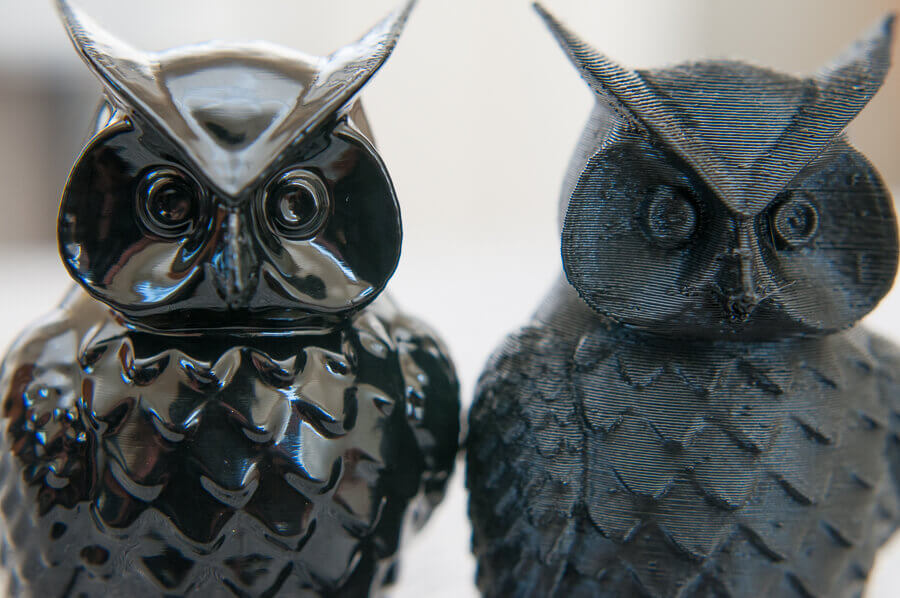
Smooth 3D Prints with Acetone Vapour
In order to print a beautiful and shiny part you don’t need to have an expensive 3D printer with high resolution. Even with higher resolutions the quality of a 3D printed part is limited and the post processing would be a requirement.
Using the techniques introduced in this post, you will enjoy creating the parts with really excellent finish and appearance disregarding printing resolutions. And more importantly you will save a lot of printing time, energy and money by avoiding the time consuming high resolution 3D printing.
And here are the methods….
3D Printing Smoothing
This page focuses on following 3 different smoothing methods :
- Smoothing using Solvent , Primer and Colour
- Using Acetone Vapour for smoothing
- Smoothing using Epoxy
We should keep in mind to consider safety precautions especially in relation to the first 2 methods because they use highly inflammable materials as solvents.
The important benefit about all these methods is that you are transferring the time consuming steps of part manufacturing from the 3D printer to the post processing activities. In other words you don’t need to spend a lot of time printing the parts with minimum layer thicknesses for better appearance qualities. You just print quickly with minimum quality and then improve it with the above methods.
Smoothing using Solvent , Primer and Colour
This method uses 3 following easy steps:
- Use solvent to remove the uneven high points of the part. ( Remove the hills )
- Use primer to cover the low points of the part. ( Fill the valleys )
- Cover the part with your favourite colour and coating to create the beauty in your parts
CAPINC Youtube Channel has prepared this really interesting and helpful video. We don’t intend to repeat the words. Just enjoy the video and use it to create beautiful parts.
Smoothing using Acetone Vapour
It’s unbelievable! With some really easy steps and ordinary tools, we can create much more beautiful parts. Thanks very much from Luke from DIY Perks Channel for this really helpful and interesting video. Watch, enjoy and use it!
Don’t forget to consider the safety precautions. These actions include but not limited to having a ventilated area, wearing masks and gloves.
Some Important Point!
- Avoid over smoothing because it could remove some important details.
- Smoothing occurs during the drying process so make sure you remove the cover nearly half way before the completion and let the part dry.
- Smoothing best works when you use filaments with good quality. Using low quality elements may have adverse effects and less effective smoothing.
Smoothing using Epoxy
Thanks to TechWizTime youtube channel for preparing this interesting and helpful video. In this video you will see how to use epoxy resins to perform the smoothing process on your 3D printed parts.
The epoxy is much less combustible than Acetone and this could be an advantage over the Acetone. It is not odorless but better than Acetone. You also need to use a ventilated area to work with it.
It takes 12 hours to completely fix. Acetone vapour is much faster and takes around 2 hours.
In Acetone vapour method you move the material on the surface of the part but in Epoxy resin method you add some material to the part. So the design considerations to obtain correct dimensions on the final parts could be different.
Now sit back and enjoy this video.
Bottom Line
Success in 3D printing doesn’t necessarily need an expensive machine. With some really easy techniques you can create stunning beauties. We just need to be open , learn and practice. So let’s start now!
All the above smoothing processes add or remove materials to or from your models and for dimensional accuracy you need to consider this fact in the design of your 3D model.
Also note that with the first two methods ( which include solvent ) the quality of the filament affects the smoothing process. In other words you need to use material with good quality for the best result. The epoxy method is not sensitive to the quality of the material. Why?…
Thank you very much for accompanying us in this post. Please let us have your comments to enrich it.
We invite you to visit the other posts of this website as well.
Useful Links
Cold Acetone Vapour Finishing for 3D Printing
Acetone Welding and Smoothing 3D Printed ABS
The post Make Your 3D Prints Shiny and Beautiful! appeared first on Best Cheap 3D Printers.
]]>